
By
Emre Toptanci
on 31/12/2025, 00:00
Last updated on 9/28/26, 10:55 PM

We must admit it: In Jira, History tab frustration is a real thing.
Jira’s issue (work item) history is a “logbook” that records every single event during a project’s journey. It is comprehensive, but the presentation of the data is simply chaotic. This makes finding a specific field change a time-consuming effort. Analyzing changes across multiple work item (issues) is probably harder than finding a needle in a haystack.
This blog provides a comprehensive guide for isolating and reporting on specific issue fields using both native methods and the advanced capabilities of Historian – History Explorer for Jira.
How to Get Issue History with Built-in Features?
Jira allows you to search for issues based on their history using JQL (Jira Query Language), though it cannot generate a clean report of those changes. You can use JQL to locate issues where a specific field was modified. This helps find the work items, even if it doesn’t show you the specific changes in a list view. Here are some operator examples:
Find Status Changes: status CHANGED FROM “In Review” TO “In Progress”
Find Assignee Changes: assignee CHANGED BY “john.doe”
Find Changes in a Date Range: status CHANGED DURING (“2025-01-01”, “2025-03-31”)
JQL can solve some problems, but it falls short in other areas. JQL tells you which issues changed, but to see what happened, you must open the issue, scroll to the Activity section, and click “History”. This view is unfiltered, cannot be exported, and only shows one issue at a time.
How Historian – History Explorer for Jira Makes It Easier?
Historian helps you to transform raw Jira issue history data into a structured, filterable grid. Here is the step-by-step guide to isolating specific field history, for any system or custom field:
Step 1: Define Your Scope with JQL
Upon accessing the app via the “Apps” menu, the first step is to tell Historian which issues to analyze.
Use the JQL bar at the top of the page to filter the result set.
Example: project = “Sample Scrum Project” AND updated > -90d
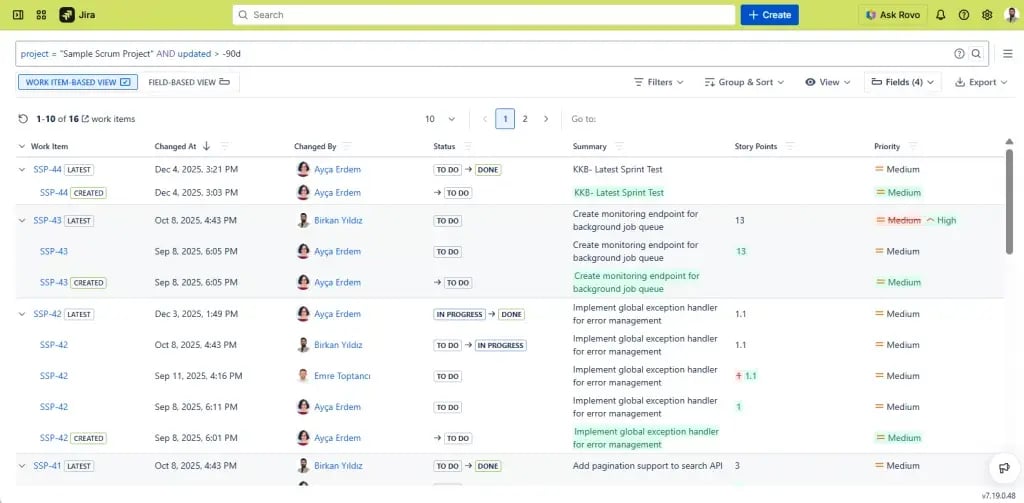
This ensures you are only pulling history for relevant tasks, rather than the entire instance.
Step 2: Select Only the Fields You Need
This is the most critical step for cutting through the noise.
By default, history logs contain every change to every field.
Use the Fields menu to select only the attributes you are investigating (e.g., “Status,” “Priority,” or a custom field like “Story Points”).
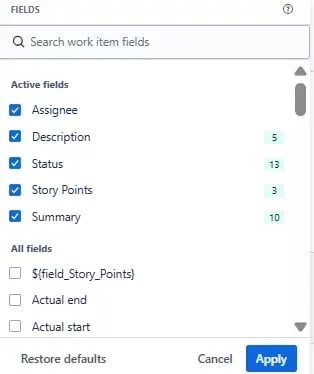
Historian – History Explorer for Jira will instantly filter out all other “noisy” data (like description edits or label changes), leaving you with a clean dataset.

Step 3: Choose Your View Mode
Historian offers two distinct views depending on how you want to visualize the data.
Option A: Work Item-Based View: Use this if you want to see the full narrative of specific issues.
Each issue appears as a row. You can expand the row to see a nested list of all changes that happened to that issue.
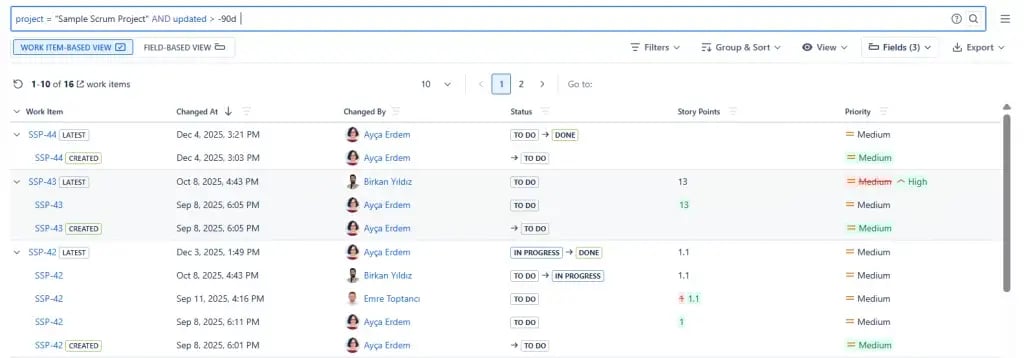
Option B: Field-Based View: Use this if you want to track the evolution of a specific attribute across the whole project.
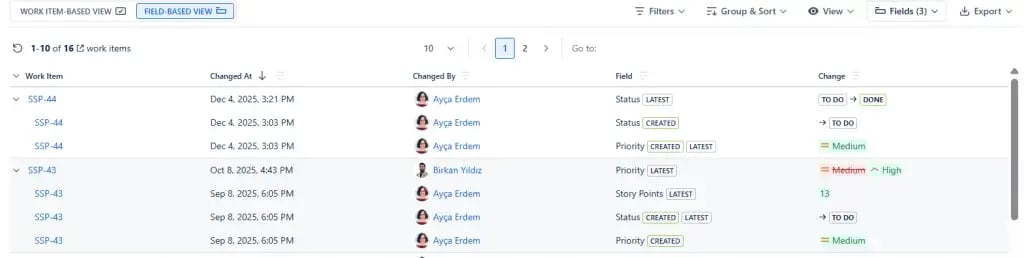
Field names are displayed as columns. Each row represents a single change event.
Step 4: Filter the Data
Once your report is generated, you can drill down further using column filters.
Filter by User: Use the Changed By filter to see updates made only by specific team members.
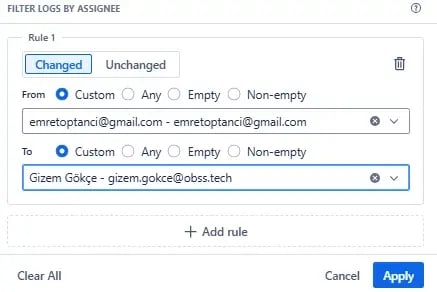
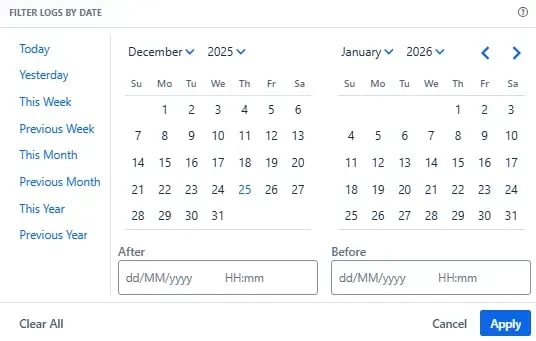
Filter by Date: Use the Changed At filter (or the Date Trimmer) to see changes from “Last Week” or a specific custom range.
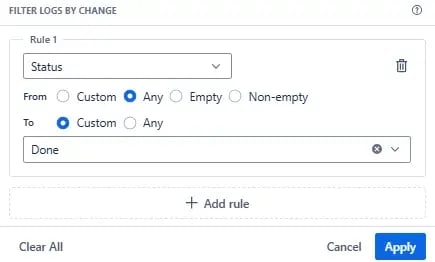
Filter by Value: In Field-Based View, you can filter specific columns. For example, you can filter the “Status” column to show only transitions that went to “Done”.
Step 5: Export for Analysis
Unlike native Jira, Historian allows you to take this data out of the system.
Click the Export menu at the top-right. Select XLSX or CSV to download the report.
To learn more about Historian, visit its Atlassian Marketplace page. You can also visit the official Historian documentation page or book a demo.

Tracking Jira Issue History Faster with the Historian AI Assistant

New Feature: Compare Dates to See What Changed in Your Jira Issues